- #204 - 32112 South Fraser Way, Abbotsford
- info@integritydrivingschool.ca
Call us Now!
+1 (604) 744 1222
Click on a topic below for more explanations / pictures & videos
“Phrases in green are suggestions to say to your examiner”
– Emergency Equipment
1) First Aid 2) Fire Extinguisher 3) Flares
– Drain Wet Tank or explain A.D.I.S
(Air Dryer Integrated System)
(Side 1)
(Side 1)
– Washer Fluid / Clamps / Hoses / Block – no leaks on or under vehicle
– Belts / Power Steering / Compressor (Governor) / Main Air Line
– Engine Oil (if this side)
– Check all the Steering Components – minimal play
– Frame / Suspension & Steering Axle
(steering axle – axle #1)
– Air Line / Brake Chamber / Brake Push Rod Travel (1/2 to 3/4 inch)
– Wheel Seals / Rim / Sidewalls / Tread / Inflation / Lug Nuts
(Side 2)
(Side 2)
– Coolant Level / Hoses & Clamps / Exhaust / Belt(s)
– The Block – no fluid leaks on or under vehicle
– Engine Oil (if this side)
– Check the Tie Rod for play
– Frame / Suspension & Steering Axle
– Air Line / Brake Chamber / Brake Push Rod Travel (1/2 to 3/4 inch)
– Wheel Seals / Rim / Sidewalls / Tread / Inflation / Lug Nuts
– Close Wet Tank (if applicable)
– Check Warning Lights
– No A.D.I.S. – confirm the one way Check Valves are working
(the air pressure is still up)
– Start Engine – in Neutral, with Clutch 1/2 way down
– Oil pressure / Charging System / Fuel
S pattern scan or (We Should Do Homework)
– (W) – Windshield/ Wipers & Washer/ Windows/ Mirrors
– (S) – Seat / Seat Belts / Steering Wheel
– (D) – Dash Lights / Defroster / Documents –
(R.I.P.) Registration / Insurance / Pre-Trip
– (H) – Horns / Hazard Lights / High Beam Indicator
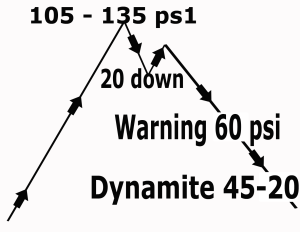
– Governor check:
Governor unloads the Compressor
(needles stop climbing, steady pressure (105-135 psi)
– Release Spring Brakes – (push Tractor & Trailer Buttons IN)
– Fan Brakes down ~20 psi (no lower than 80 psi)
– Governor check:
Governor reloads the Compressor (air pressure starts climbing)
– Low air warning: fan brakes until Warning Devices come on
(Confirm on at 60 psi or above)
– Fan Brakes further until Trailer Spring Brakes Dynamite (45-20 psi)
(The Trailer Button must pop out and the Tractor Button may also)
– Shut Off the Truck
– Check that the Spring Brakes have Dynamited On Trailer
(slack adjuster at approximately 90 degrees to the push rod)
– Remove the Glad Hands – Check for Air Leaks
– Foot Brake Application – Listen for Air Leaks
(Tractor Protection Valve)
– Glad Hand Seals / Connect Airlines / Electrical Cord
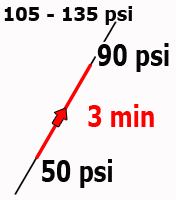
– Set RPM between 1,000 to 1,200 RPM
– Time: air building from 50 to 90 psi (Confirm less than 3 min.)
– Release Spring Brakes – (push Tractor & Trailer Buttons IN)
– build air until the Governor unloads the Compressor (105-135 psi)
– Shut off Truck
– If electric gauges – Ignition may need to be in the ON position
– Make a full brake application for 1 minute (time after the gauges settle)
– Confirm Air Loss is no more than 4 psi in 1 minute
– Turn on the Left Signal (ignition ON if required)
– Turn on the High Beam
(Down Side 1)
(Down Side 1)
– Check the Headlights – High Beams / Low Beams
– Clearance & Marker Lights / Licence Plate – valid
– No leaks under the vehicle / Signal Lights – front and side
– Mirrors / Lights / Batteries & Cables
– Steps, Handrail / Door / All Compartment Doors
– Fuel Tank, Cap & Straps / Exhaust Pipe & Muffler (if this side)
– Air Lines to and from the air tanks / Front Drive Shaft / Differential
– Air Bags
(tractor axle – # 2)
– Airlines / Brake Chambers / Brake Push Rod Travel (1/2 to 3/4 inch)
– Short Drive Shaft / Rear Differential
– Air Bags
(tractor axle – # 3)
– Airlines / Brake Chambers / Brake Push Rod Travel (1/2 to 3/4 inch)
– Locking Jaws on Fifth Wheel – closed
– Left Signal / Tail Lights / Licence Plate & Light
– Landing Gear / All Trailer Cross Members
– Supply & Control Air Lines / Electrical Cord
– Fifth Wheel / Frame
– Air Bags / Suspension
(tractor axle #2 & #3)
– Wheel Seals / Rims / Sidewalls / Tread / Inflation / Lug Nuts
– Nothing between Duals / Mud Flap
– Front Clearance Lights / Trailer Damage / Reflective Tape
– Marker and signal lights on the side
– If Flat Deck – Load & Tie Downs
& Suspension
(trailer axle # 4 )
– Slider Airlines not hanging too low / Air Bags / Axle
– Airlines / Brake Chambers / Brake Push Rod Travel (1/2 to 3/4 inch)
& Suspension
(trailer axle # 5 )
– Air Tanks & lines / Air Bags / Axle
– Airlines / Brake Chambers / Brake Push Rod Travel (1/2 to 3/4 inch)
– Slider Rail & Pins / Frame
(trailer axle # 4 & # 5)
– Wheel Seals / Rims / Sidewalls / Tread / Inflation / Lug Nuts
– Nothing between the Duals / Mud Flap
– Load Security – open rear door, check load, close doors
– Rear Clearance, Signal & Tail Lights
– Reflective Tape
– License Plate – Valid & Secure / License Plate Light
– Ask Examiner to confirm that the Brake Lights are working
1) Left signal OFF
2) Make a light Brake Application
3) Right signal ON
4) Apply Spring Brakes – ( pull Tractor & Trailer buttons OUT)
– Right Signal / Tail Lights
(Up Side 2)
(Up Side 2)
– Slider Rail & Pins / Frame
(trailer axle # 4 & # 5)
– Wheel Seals / Rims / Sidewalls / Tread / Inflation / Lug Nuts
– Nothing between the Duals / – Mud Flap
– Rear side Clearance lights / Trailer Damage / Reflective Tape
– Marker & Signal Lights on the side
– Right Rear Tractor Signal Light
– Front Clearance lights
– Vehicle Inspection Decal – Valid
– Fifth Wheel / Frame
– Air Bags / Suspension
(tractor axle # 2 & # 3)
– Wheel Seals / Rims / Sidewalls / Tread / Inflation / Lug Nuts
– Nothing between the Duals / – Mud Flap
– Exhaust Pipe & Muffler (if on this side) / Compartment Doors
– Fuel Tank, Cap & Straps
– Steps / Handrail / Door
– Vehicle Inspection Decal – Valid
– Mirrors / Signal & Marker Lights
– Make sure the Spring Brakes are applied
– Remove theBlocks
– IN Neutral with the Clutch 1/2 way down
– Tractor Spring Brakes
(Trailer Button IN / Tractor OUT)
– Trailer Spring Brakes
(Trailer Button OUT Tractor IN)
Kingpin & Fifth Wheel
– Trailer Service Brakes
(Trailer & Tractor buttons IN)
– Apply Hand Valve
– Tractor Service Brakes
(Trailer & Tractor buttons IN)
– Roll forward – Apply Foot Valve
– Fill Out Trip Inspection Report

